Some people live to eat. Others eat to live. And the there are those of us who aspire to do both.
In 2004, just days after my 21st birthday, I survived an aggressive attack of lupus; my kidneys, however, did not. And from the beginning I vowed to do what I could, on top of receiving amazing medical care, to stay healthy and strong. That meant keeping a strict, low-sodium diet. But as a stubborn 20-something, I was also equally resolute to not eliminate the flavor, spontaneity, or social fun of eating from my life. I refused to eat bland food or feel like a second-class culinary citizen because of my diet. And in a world where salt sits on a flavor pedestal, I decided that it was time to rewrite the low-sodium rules (uninspiring) and prove that salt-free dishes could keep up (exciting).
The result was beet bloody Marys, pad thai with umami mushroom "fish sauce," and my debut cookbook, Sodium Girl's Limitless Low-Sodium Cookbook, filled with more than 100 other low-sodium twists on favorite salty dishes. Forced to explore a world of flavor beyond salt (and in turn, my food comfort zone, which was mainly pizza and traditional American fare), I quickly discovered I was a much more boring eater before my restrictions than after. And that, due to my restrictions, I opened my eyes and palate to a wider range of ingredients, cuisines, and culinary tricks that enlivened my kitchen, my plate, and my weekly dinner parties.
With inventive approaches, I learned how to make over almost any salty dish and make it guest-worthy. I found that whimsical takes on high-sodium meals (like Zucchini-Wrapped Halibut Scallops and Macaroni 'N' Peas) not only tasted good, but also won over other eaters with their creativity. I realized that with some instruction, friends, family, and chefs enjoyed conquering a salt-free cooking challenge. And most importantly, by focusing on the boundless options rather than the single restriction, I witnessed many people who once refused a low-sodium diet, inspired to play a powerful role in their health care, simply with their kitchen and their own two hands -- proving that one really can eat to live, live to eat, and enjoy everything in between.
Want more proof or a taste? Here's a sneak preview of three favorite recipes from the book. And to further celebrate all that low-sodium food can be, I've also gathered some of the Internet's hottest bloggers to put salt aside for one day and one dish, and cook, bake, and create low-sodium style for the official release date of the book and the annual Love Your Heart Recipe Rally.
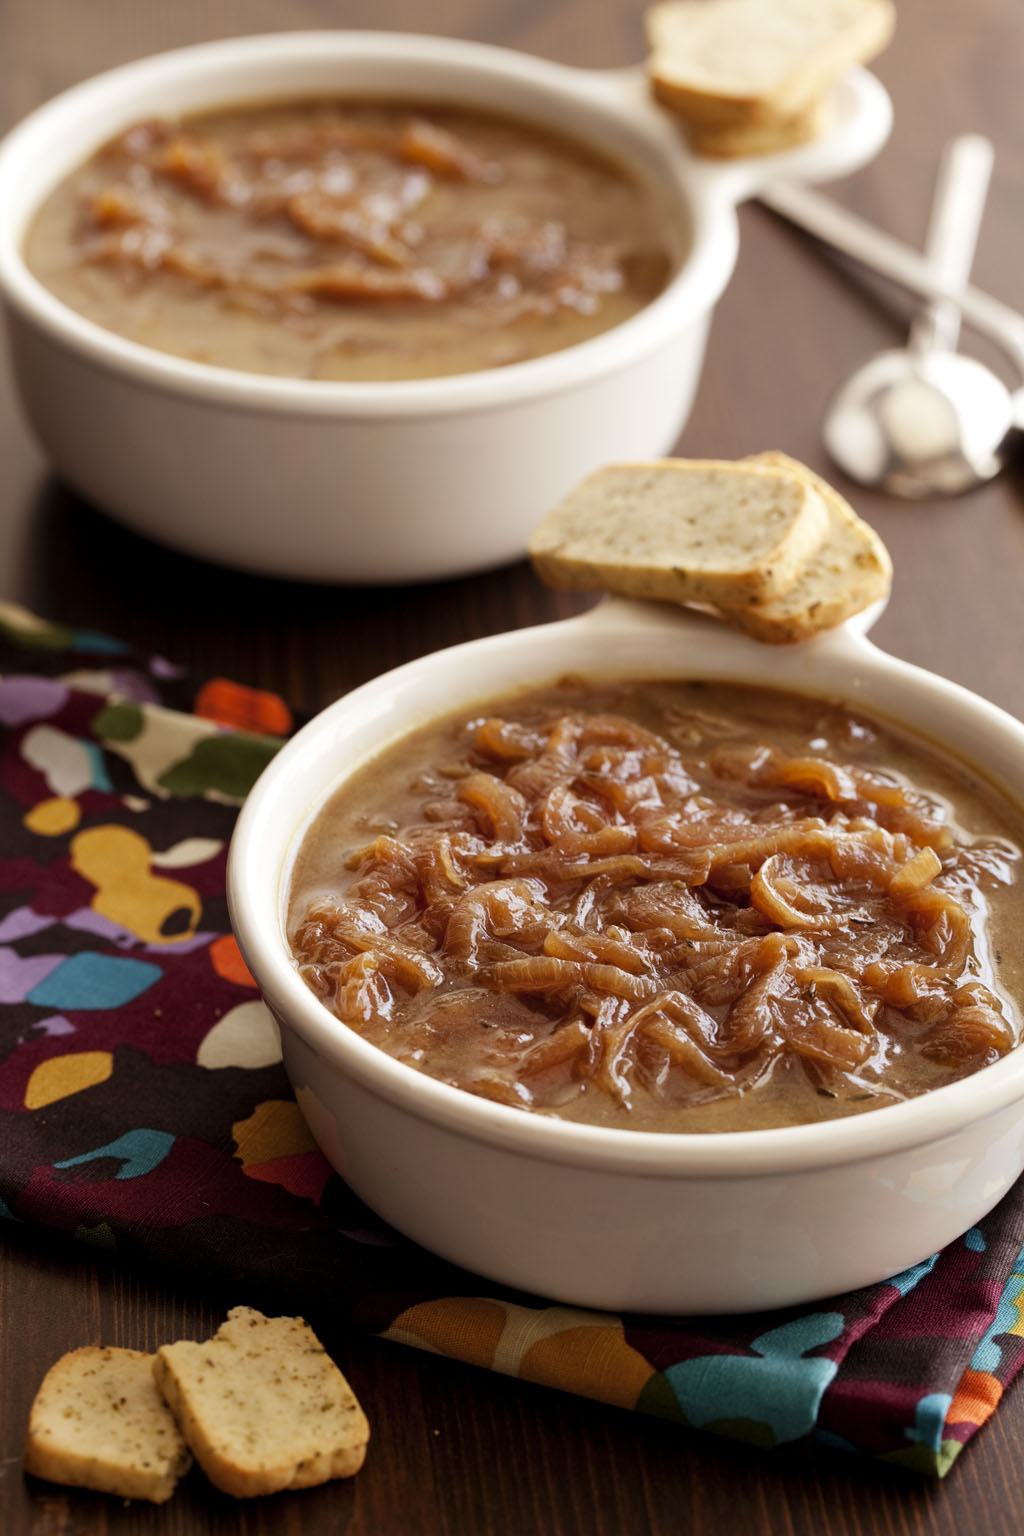 Sweet French Onion Soup With Ricotta Crackers
Rich beef broth, slow-cooked onion, and pungent cheese are melted over crusty croutons. This is a French onion soup, a comfort food to be enjoyed slowly, with a napkin and accordion music in the background. And this soup is entirely possible to make without salt.
Upon first look at that description, you might think that a truly satisfying, low-sodium French onion soup is just an oxymoron. But because reduced beef broth has its own natural saltiness, you can actually get very close to the real deal, sans sel. And you will still achieve that kiss of beefy, salty broth that lingers on your lips long after you've finished the bowl. If you want a truly low-sodium version, though, I've made this soup before without the beef broth and used both pork bones and mushrooms to make stock instead. It's less beefy, obviously, but just as good. And if you feel it can no longer be considered French onion soup, then by all means, call it something different. Like Semi-French Onion Soup. Or Italian Onion Soup. Or (insert your name here)'s Onion Soup.
Serves 4 to 6
Effort Level: Got Time to Spare
Soup
4 beef back ribs (if you can only find ribs with the meat on the bone, roast them in the oven at 400°F until the meat is cooked and can be cut off of the bone, about 40 minutes)
8 cups water
2 tablespoons unsalted butter
3 large yellow onions, thinly sliced
2 large red onions, thinly sliced
One-quarter teaspoon granulated white sugar
1 teaspoon dried thyme
One-quarter teaspoon garlic powder
One-quarter teaspoon onion powder
Pinch of black pepper
2 bay leaves
One-quarter cup red wine
One-quarter cup sherry
To make the beef broth, place the beef bones and water in a large stockpot and bring to a boil. Cook for 10 minutes and then reduce to a simmer. Cover with a lid and cook for 1 to 2 hours. (Note: This can also be done in a slow cooker to save time.)
When the broth has cooked, discard the bones and allow it to completely cool. Then, to reduce the fattiness, use 1 to 2 paper towels to skim the surface of the broth. Chill the broth in the refrigerator for at least an hour. This will cause the fat to harden at the top so you can skim it off before adding it to your soup. You should have about 6 cups of broth.
When you're ready to make the soup, place 2 tablespoons of butter in a 5-quart stockpot and melt over medium heat until browned, 2 to 3 minutes. Add the yellow and red onions and cook for 40 minutes, adding the sugar 10 minutes into the cooking to help them caramelize, stirring
occasionally to make sure they are not burning. The onions will start to shrink down and the red ones will begin to lose their color.
While the onions caramelize, prepare the ricotta crackers.
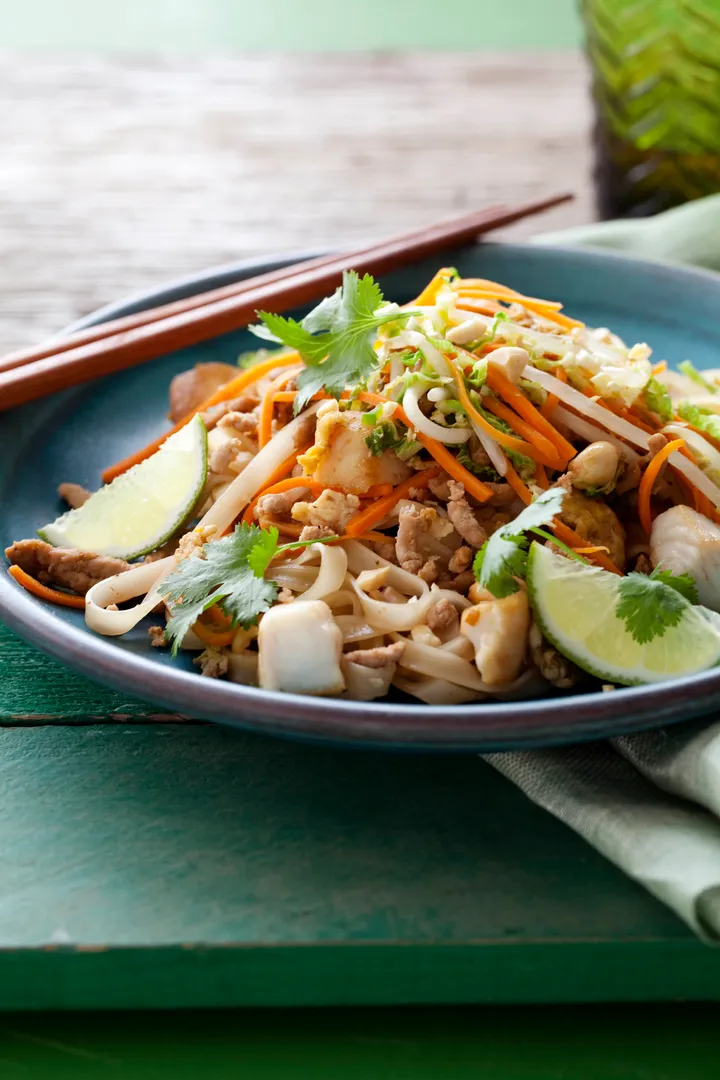
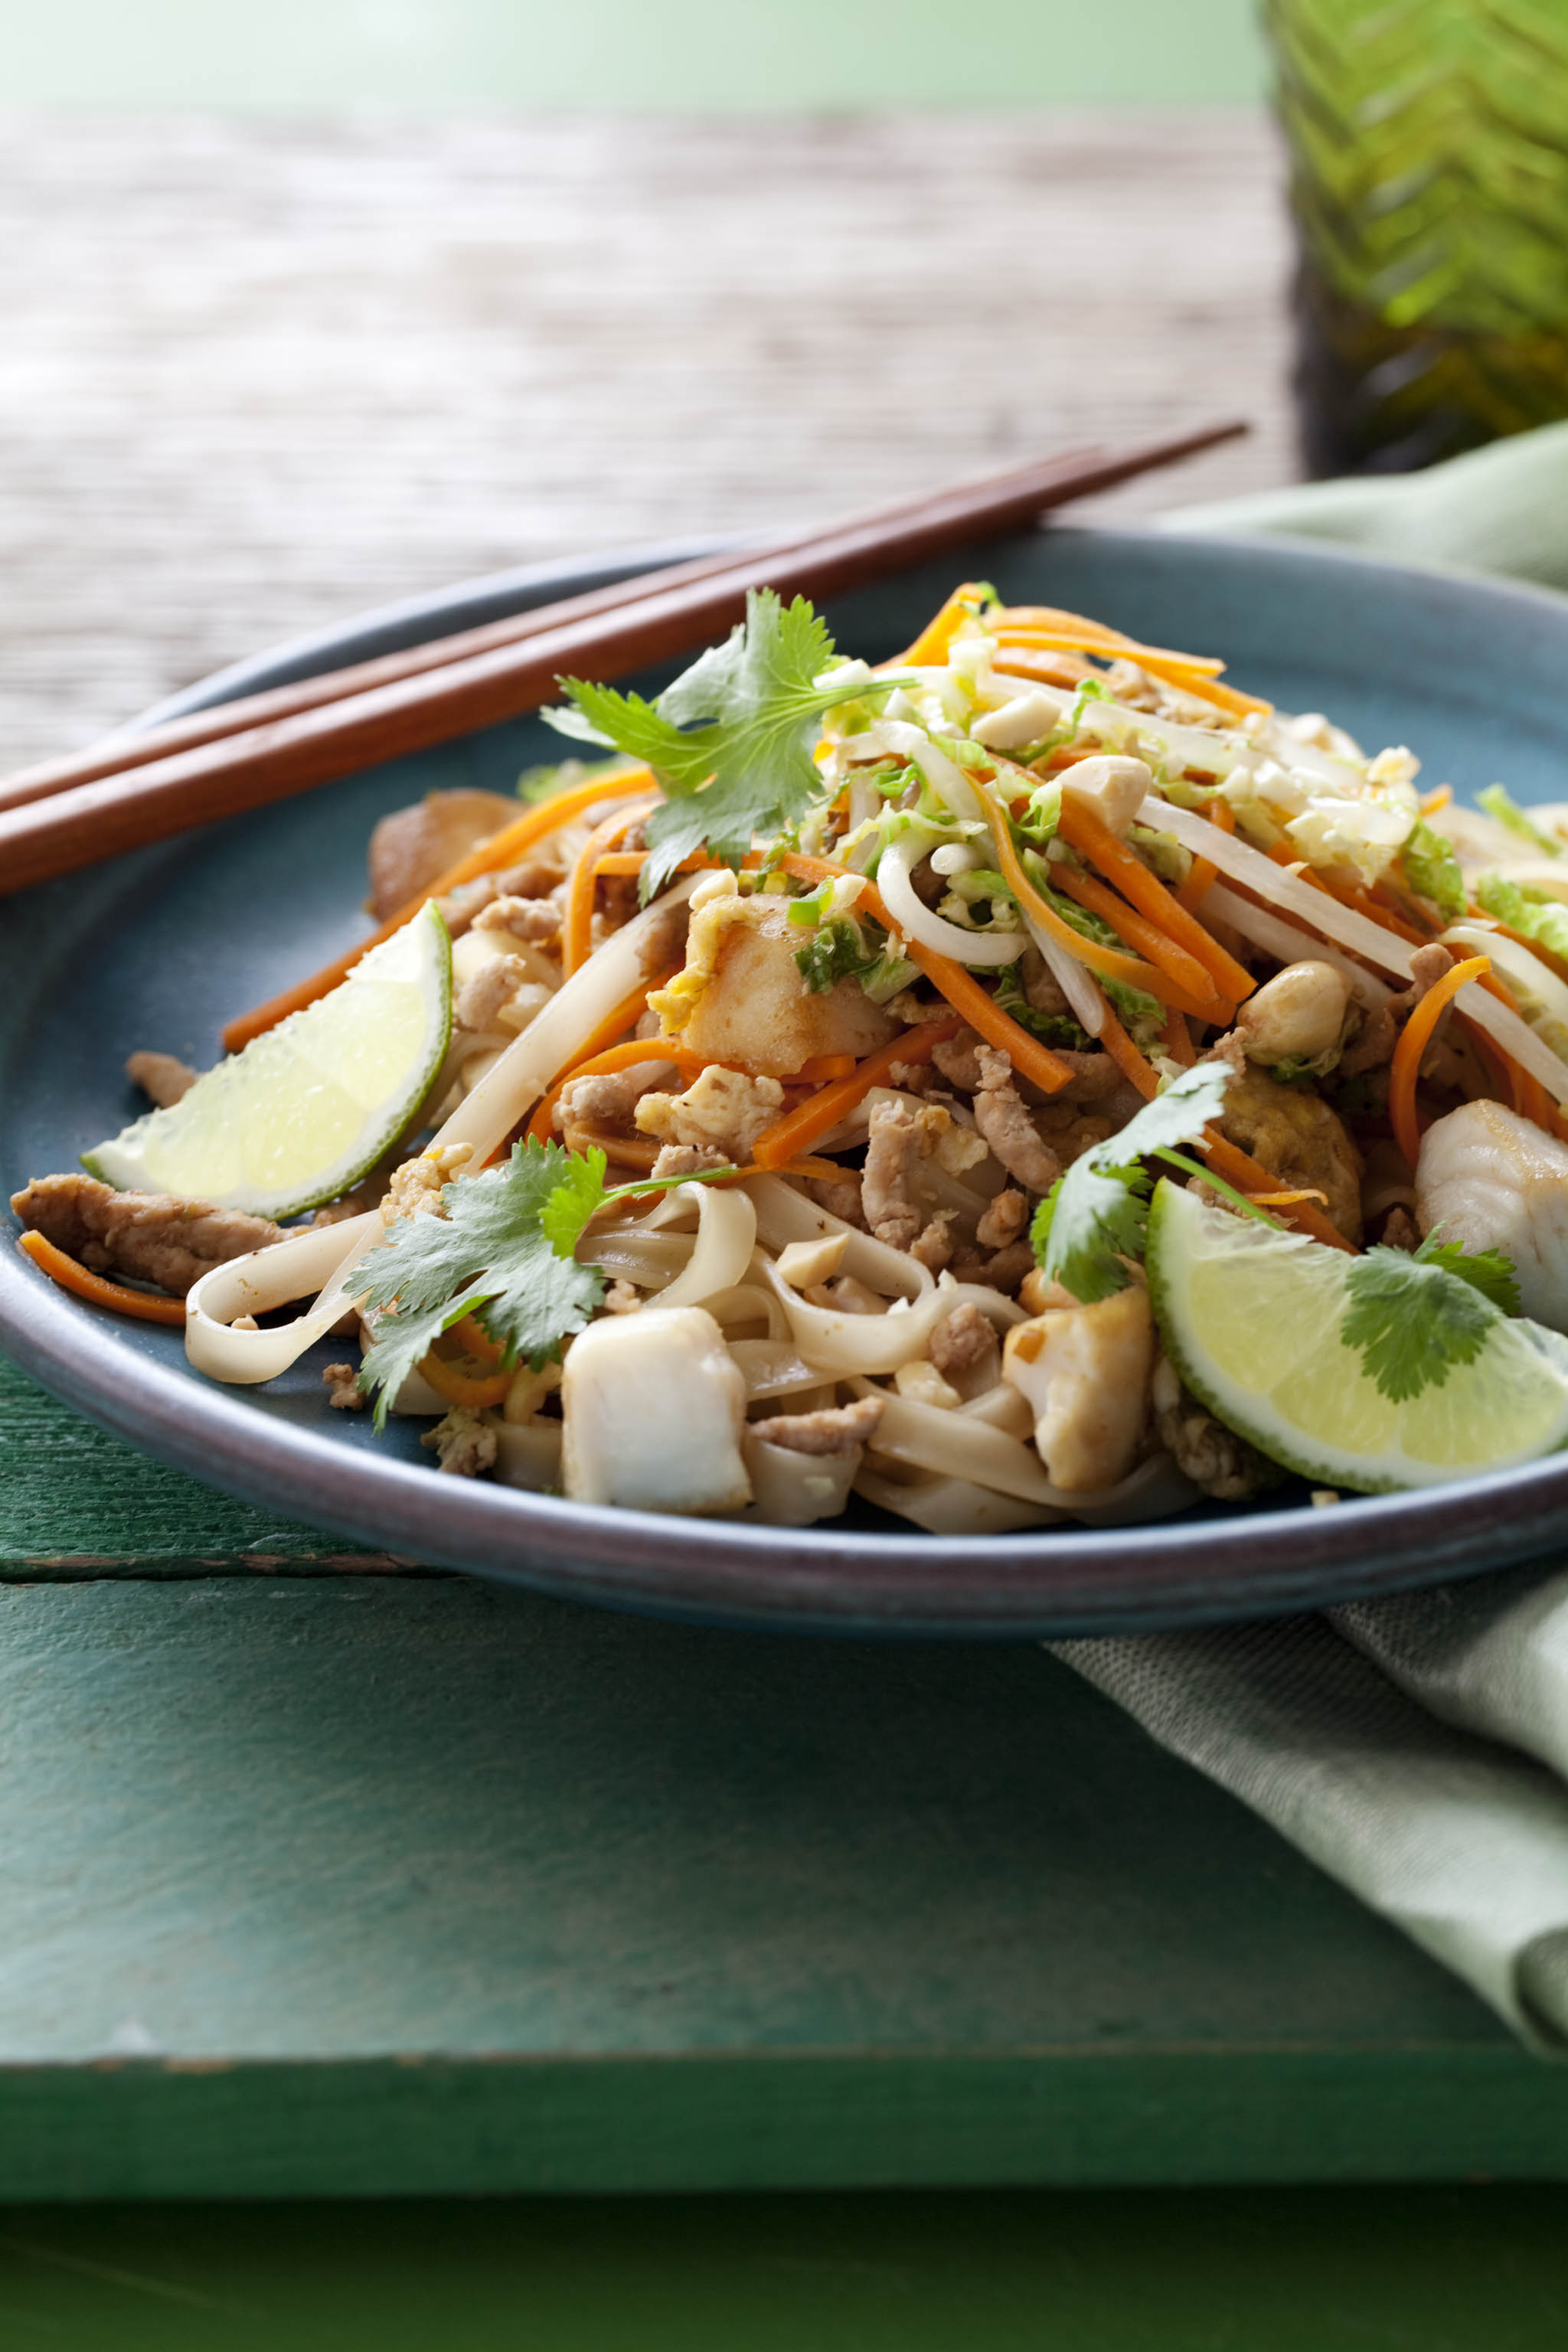 Pad Thai
Pad thai is a wonderful dish with noodles, proteins, crispy veggies, and a delicate sauce. And it is that last component -- the sauce -- that lends not only an explosion of flavor, but also a bomb of salt. It is traditionally made with tamarind paste (the sour), palm sugar (the sweet), chili powder (the spice), and fish sauce (the savory), which is basically made from salted fish that is allowed to ferment for a very long time.
To get around the fish sauce dilemma, however, I focused less on its salty properties and more on its umami flavor. I think you know where I'm going with this. I simply mixed my umami broth with the rest of the traditional ingredients and let it simmer and reduce. And if you want to really accentuate the fishy flavor in the original sauce, you can always add a few clams or fish bones to the pot when making your umami broth. Or you can simply rely on the fish that is in the dish to bring out the briny essence.
But before you do anything, take a breath. This recipe takes time. Not just because you have to make the umami broth and then the pad thai sauce before you even get to your wok, but also because pad thai is best made in batches. If you throw everything in at once, the noodles will get gummy and the wok will lose its heat. If you have everything set up around you and prepped, though, the cooking process will go smoothly and your room full of guests will be wildly entertained as you fry up their dinner to order -- just like on the streets of Bangkok.
Serves 4 to 6
Effort Level: Got Time to Spare
2 cups Umami Broth (recipe on page 140 of cookbook)
6 garlic cloves, minced (about 2 teaspoons)
1 cup packed dark brown sugar
1.5 tablespoons granulated white sugar
2 tablespoons molasses
1 tablespoon unseasoned rice vinegar
2 teaspoons tamarind paste (or
1 teaspoon pomegranate molasses)
Sesame oil, for frying
One-quarter pound ground pork
One-eighth teaspoon paprika
One-eighth teaspoon freshly ground black pepper
2 filets of rockfish or tilapia (about 1 pound), cut into bite-sized cubes (about 1 inch)
4 large eggs
Half of an 8-ounce package no-salt-added rice noodles (use your judgment to decide how many noodles you want to eat)
1 cup bean sprouts
1 medium carrot, cut into thin matchsticks (about 1 cup if you buy preshredded)
1 cup thinly sliced Savoy or Napa cabbage
1 jalapeno pepper, finely diced
1 cup unsalted peanuts, for garnish
One-half cup chopped fresh cilantro, for garnish
1 lime, cut into wedges
Sodium-free hot sauce, for serving
In a small pot, add the umami broth, garlic, brown and white sugars, molasses, and rice vinegar. Mix the tamarind paste with 1 cup of water and add it to the pot. Bring the whole thing to a boil and then immediately reduce the heat to a gentle simmer. Cover the pot and cook for 30 minutes, stirring every so often.
As the sauce cooks, prep the other ingredients. In a large skillet or wok, heat 1 teaspoon of sesame oil over medium-high heat. Add the ground pork and cook, stirring, for 2 to 3 minutes. Add the paprika and pepper and continue to stir until the pork is no longer pink, is broken up into little bits, and nicely browned, another 2 to 3 minutes. Turn off the heat, transfer the pork to a bowl, and set aside. Using the same pan, heat another teaspoon of sesame oil over medium-high heat. Add the fish and cook until the meat turns opaque, 3 to 5 minutes. Turn off the heat, add the fish to the bowl with the pork, and set aside. Wipe out the pan or wok with a cloth or paper towel.
Check on the pad thai sauce to make sure it is not reducing too much. If it is, lower the heat or turn it off all together and keep the pot covered. You want at least 1 cup of sauce to make your noodles. This is not a thick sauce -- it's silky, not sticky -- so don't be alarmed if it is on the runny side.
Fill another medium pot with water and bring to a boil. Add the noodles and cook for 4 to 5 minutes (or a few minutes less than the directions on the package) -- ideally, pad thai noodles will still be slightly firm. When ready, drain them in a colander and rinse with cold water. Using kitchen shears or a knife, cut the noodle clumps in half and set aside.
Make sure all of your pad thai accoutrements are ready to go. Have the cooked pork and fish, noodles, bean sprouts, carrot, cabbage, jalapeño, peanuts, cilantro, eggs, and noodles prepped and in bowls near your stove, because we're about to move quickly. Remember, it is best to make the pad thai one serving at a time. But, of course, if the portions look large or you have extra mouths to feed, you can always split servings in half. Either way, repeat the steps below for each batch (a total of 4) and divvy up ingredients accordingly.
In the same large skillet or wok you used before, heat 1 to 2 teaspoons of sesame oil over medium-high heat. Add a few spoonfuls of cooked pork, a few spoonfuls of fish, and a few tablespoons of the pad thai sauce. Mix until everything is coated. Then, push the meat to the side of the wok and crack 1 egg into the center. Let it set for a few seconds and then, using a wooden spoon or spatula, break it up and toss it with the rest of the ingredients. Add the bean sprouts, carrot, cabbage, and jalapeño, and mix them together, cooking and stirring for another 2 minutes. Taste a bit of the pad thai and add more sauce if it needs extra kick. Then add a fistful of noodles and stir for a final 2 minutes.
Turn off the heat and serve the pad Thai to the first guests. Offer peanuts, cilantro, a lime wedge, and hot sauce for garnish. And before making another round, wipe the skillet or wok clean with a cloth or paper towel. Keep going, you're doing great, and make sure to save a serving for yourself.
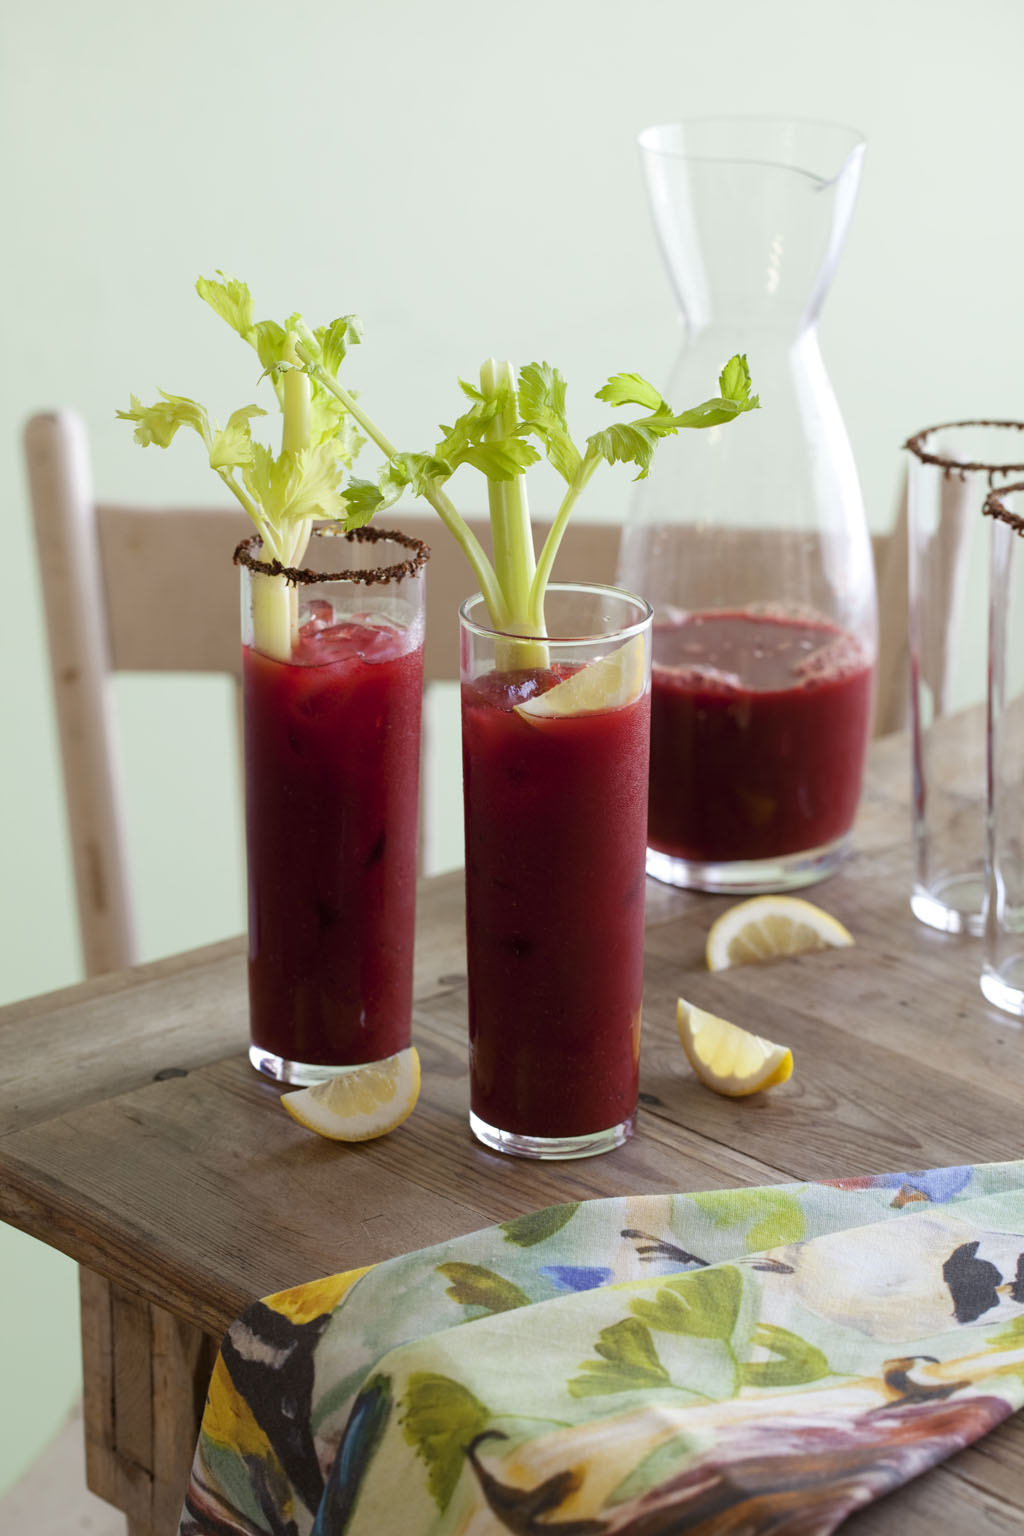 A Classic Bloody Mary
Bloodies are usually made with prepared vegetable juice, Tabasco, Worcestershire sauce, horseradish, pepper, and lemon. Bottled low-sodium tomato and vegetable juice can run as high as 170mg of sodium per cup, and Tabasco and Worcestershire can add another 200mg to the total with just a few dashes of each. But it is entirely possible to create the same tastes without these products. By using fresh or even prepared tomato puree, fresh or prepared horseradish, some homemade veggie juice, and spices, you can create a Bloody mix that doesn't miss the mark. Actually, you'll be able to taste the individual ingredients, the pucker and the spice, better than in the drinks made with those salted mixes.
And while using a juicer makes prep much easier, it isn't necessary to go out and buy one. You can get silky-smooth juice by blending your vegetables and running them through a strainer or cheesecloth. Also, don't be afraid to be creative with your presentation. The preparation below is classic. But if you have salt-free pickled grapes, cherry tomatoes, or green beans lying around, throw them in, for heaven's sake. And instead of rimming the glasses with salt, spackle the tops with a blend of freshly ground black pepper, paprika, and lemon zest for color and extra spice.
Makes 10 cups Bloody Mary
4 large celery stalks, with extra stems for garnish
2 small red beets, trimmed and peeled
1.5 red bell peppers, stemmed and seeded
4 cups no-salt-added tomato puree 1 (24-ounce jar has a little more than 3 cups, so you can always fill the jar with 1 cup water and shake to loosen the leftover tomato puree to make 4 cups)
1 to 2 teaspoons prepared low-sodium horseradish
1 to 2 teaspoons freshly ground black pepper
2 teaspoons smoked paprika
One-half to 1 teaspoon cayenne pepper
2 lemons
1 tablespoon white wine vinegar
Ice, for garnish
If you are using a juicer, juice the celery, beets, and bell pepper. Place the liquid into a pitcher or large mixing bowl and add the tomato puree.
If you are using a blender, put the celery, beets, bell pepper, and tomato puree into a blender. Pulse until you have a vegetable smoothie. Then make a sturdy pouch out of some folded cheesecloth and, over a pitcher or a large bowl, carefully pour the blended veggies into it. Gather the cheesecloth at the top to close and then squeeze. Really squeeze, many times, until all the juice runs out of the cheesecloth and all you have left inside is dry veggie pulp. If you don't have cheesecloth, you can also pour the veggie smoothie into a fine-mesh sieve and use a wooden spoon or the bottom of a ladle to press down on the puree, squeezing the juice through until you have strained every bit into the pitcher or bowl. Set all your vegetable scraps aside.
Now that you have your vegetable juice, add 1 teaspoon of the horseradish, 1 teaspoon of black pepper, the smoked paprika, cayenne, juice of 1 lemon, and vinegar to the pitcher or bowl. Whisk together and taste, adjusting the spices (oh hello, horseradish and pepper) according to your cocktail preferences. I like mine spicy!
Place the Bloody Mary mixture in the refrigerator to chill, 15 minutes minimum or 2 hours maximum.
When you're ready to serve, fill glasses with ice. Pour in Bloody Mary mixture and add a celery stalk for garnish. Cut the remaining lemon into wedges and offer them to guests as well for extra citrus punch. Finally, stir, sip, and savor.
Photo credit: Matt Armendariz
For more by Jessica Goldman Foung, click here.
For more on diet and nutrition, click here.