When we had a cookie giveaway contest on our blog in November, among the many suggestions for dream cookies we received a challenge in the comments section. The issuer was Sara, a long-time loyal reader, not to mention the inventor of New Favorite Tofu. She told us about the Italian nut cookies called brutti ma buoni, which she eats at a Fort Greene Italian restaurant. At Locanda Vino et Olii, she claims, the brutti ma buoni are better than any version she's tried in Italy. "How about if I buy you a cookie from Locanda and you figure out how to make it?" she wrote.
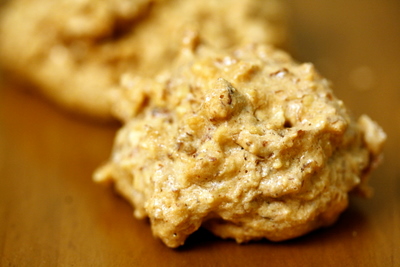
A month and a half later, true to her word, Sara drove by my apartment and dropped off a metal takeout tin. Inside were four light brown lumps with rough tops. I peeked inside. "They're beautiful," I said. "Well they're really not," she said. She was right. Brutti ma buoni means "ugly but good" in Italian, and I guess these are relatively ugly cookies, at least until you know what they taste like. Then, as it should, inner beauty wins out.
Although brutti are made with the ingredients of any old meringue cookie, they have a different texture than your run-of-the-mill crumbly cloud of egg white. They are chewy, as though the almond in the batter has morphed into marzipan, and they are deeply, resonantly flavorful. I could see why their recipe was a bit of a mystery though, as I had no real idea what created either texture or flavor.
My investigation started with Google Images: my theory was that if I could find a picture that resembled the cookies Sara had given me, then I'd be on the right track. This approach actually worked. The website I found was in Italian, though, its measurements in grams, and even after Google translation, it was just barely legible ("Shelled the almonds and allow to burn for a while"). It did assure me of one procedure I hadn't yet heard of, in relation to these or any cookies: after whipping up egg whites with sugar and adding the nuts, the batter gets cooked for half an hour on top of the stove before being dropped into cookie portions and baked. A few more Googles confirmed that while some cooks simply drop the whipped, sugared egg white into the oven to bake, the more authentic approach seemed to rely on this odd half hour of sauteing.
I read a few more recipes, morphing their proportions, ingredients, and cooking times into my own, and then I got going. I worked next to the cookies from Sara, as though they'd somehow cough up their secrets, provide me with some luck, or at least be there for comparison. Just to make sure the pre-cooking was necessary, I baked one cookie just after beating the eggs and folding in the nuts and sugar. The result was definitely ugly, but though its taste was faithful to the original, its texture was light, chalky, and crumby, like that of a meringue. No dice.
However, the cookies I baked after the pre-cooking: these were good. They had a much richer taste, I guess from the caramelizing of some of the sugar, and they were dense. But they still seemed a little too crunchy, a result, I determined, of their small size. When I increased each cookie's load by about threefold, I was rewarded with big ugly mounds that smelled delicious, were dense in texture and had just the flavor I'd set out to create.
I tested them once more for good measure, and then I shared the new recipe with Sara. At first she seemed dismayed at the numerous steps and figured she'd just as soon buy future cookies from the restaurant. But then she made them at home--tweaking as she went, and realizing that many parts could be done in advance--and she wrote back happy and, I can only imagine, full to the brim with these caramel-y, nutty sensations.
--Cara Eisenpress, of Big Girls, Small Kitchen
Brutti Ma Buoni
Makes 12 large cookies
It's important to keep the almonds and the hazelnuts separate when toasting them, since you'll be grinding them to different consistencies. You can use separate trays, or toast them at two different times if you'd like. Watch them carefully: you really don't want them to burn.
Ingredients
1 cup slivered, blanched almonds
1 cup raw hazelnuts
2 tablespoons powdered sugar
1 cup minus 2 tablespoons sugar
3 egg whites
1 teaspoon natural-process cocoa powder
1 teaspoon vanilla extract
Preheat the oven to 325°F. Toast the hazelnuts for 3-4 minutes, then add the almonds to the other side of the tray and toast another 3-4 minutes, until both nuts are fragrant and just slightly gold. (it's harder to see when the hazelnuts are done, but they should be fragrant and if you taste one it'll have a much richer flavor than when raw.) Keeping the nuts separate, remove to two plates and set them in the freezer to cool. (You can toast and cool the nuts in advance.)
When the nuts are cool, peel the hazelnuts by rubbing them between your fingers. The toasted skins will usually fall off quite easily; don't worry about any that remain on.
Combine the almonds and 1 tablespoon of powdered sugar in a food processor. Pulse to grind finely, making sure that the nuts don't become oily or butter-y (the powdered sugar helps with this). Remove to a bowl. Add the hazelnuts to the processor with the remaining tablespoon of powdered sugar.
Pulse to chop coarsely--these should be larger than the ground almonds, though it's fine if some of the hazelnuts grow quite powdery. Pour into the bowl with the other ground nuts.
Put the egg whites into a bowl and whip them until they hold soft peaks. Add the sugar slowly, while continuing to beat for another thirty seconds or so (with a handheld mixer). By then, the eggs should be quite firm and somewhat smooth/silken.
Fold in the nuts, cocoa powder, and vanilla extract.
Turn the batter into a large, heavy-bottomed stock pot. Over the lowest heat, cook it, stirring frequently but not constantly, for 15-20 minutes. (Use a pan that cleans up easily--the egg whites and sugar do grow sticky during this.) As you cook, the batter will deflate and grow more molasses-y. It will also darken in color. When it is fragrant and hot to the touch, remove from the burner. Let the batter rest for about 15 minutes.
While you're cooking the batter, preheat the oven to 315°F (or turn it down if you left it on from the nut toasting). Using two spoons, heap mounds of batter the size of 2.5 tablespoons on the baking sheet. Bake for about 30 minutes, until the tops look dried out and the cookies are firm but not browned. Cool completely. These keep for days in an airtight container.