
The following is an excerpt from "How to Sharpen Pencils: A Practical & Theoretical Treatise on the Artisanal Craft of Pencil Sharpening for Writers, Artists, Contractors, Flange Turners, Anglesmiths, & Civil Servants" [Melville House, $15.95]. The book is written by artisanal pencil sharpener David Rees, who employs a tone that's at once hilarious and informative:
It is assumed the reader is already somewhat familiar with the #2 pencil. Let the remarks below serve only to further refine his or her understanding in the context of best sharpening practices.
The typical #2 pencil is made of cedar. It is 7 1/2" long, with a wooden shaft measuring 6 3/4".
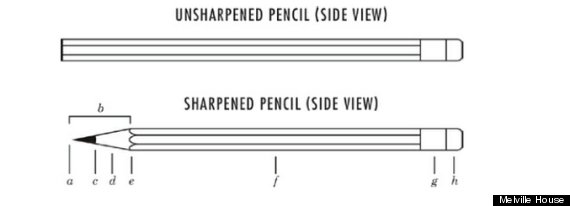
a. THE TIP of the pencil is the marking surface farthest from the eraser.
b. THE POINT of the pencil, for the purposes of this book, refers to the cone whose end is the pencil’s tip and whose base is the upper limit of the unshaped shaft. This means the point is composed of exposed graphite and cedar. (Conservative readers may object to this nomenclature; I trust they will become convinced of its utility as our book unfolds.)
c. THE COLLAR TOP is the boundary between cedar and graphite.
d. THE COLLAR is that part of the point with no exposed graphite. If one thinks of the exposed graphite as a balancing visual analogue to the eraser, the collar serves as a visual analogue to the ferrule.
e. THE COLLAR BOTTOM is the boundary between the bottom of the cone and the top of the untooled shaft. (On hexagonal pencils, it is defined by scalloped edges where the shaft’s planar surfaces taper into the exposed cedar point; cylindrical pencils feature no such scalloping along the collar bottom.)
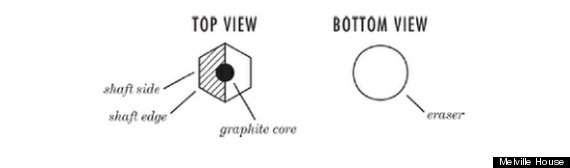
f. THE SHAFT is the wood casing surrounding the graphite core. It is also known as the body of the pencil. For #2 pencils sold in the United States, it is most often hexagonal.
g. THE FERRULE is a crimped piece of metal connecting the shaft of the pencil to the eraser.
h. THE ERASER is a mystery.
A pencil’s “lead” is actually made from a mixture of graphite, clay, and wax, with a bonding agent applied to seal it inside the wooden shaft. This process was first developed by the Frenchman Nicolas-Jacques Conté in the late 18th century — an innovation that led to France’s dominance of the pencil trade for years.
The amount of clay in the mixture determines the hardness of the lead — the more clay, the harder the point and the lighter the line. There is still no single international standard as to pencil-lead gradations. This book (and my business) focuses exclusively on #2 pencils, sometimes called HB pencils.
For years, I assumed pencils “got graphite” by having it injected into their hollow shafts. In fact, a close look at the unsharpened, or “raw” end of a pencil will usually reveal differences in color and/or grain of the opposing halves. This is because pencils are composed of two grooved pieces of cedar with a length of graphite sandwiched between them.
Most #2 pencils are hexagonal. The design is justified by logistical and utilitarian concerns: Manufacturers realized the same piece of wood yielded more hexagonal shafts than cylindrical shafts; hexagonal pencils are less likely to roll off slanted drafting tables.
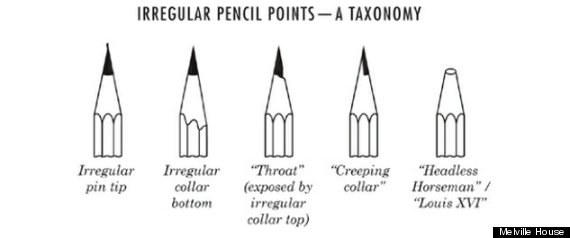
You should always inspect a pencil before sharpening it. The early history of pencil production was marked by inconsistency of manufacture and outright fraud (some pencils’ leads only extended a few inches into the shaft; by the time the user sharpened a pencil enough to realize the deceit, it was too late). In our own time, as more and more pencils are produced abroad with an eye on minimizing cost, we are beset with low-quality examples of the classic #2 pencil, and it behooves us to inspect them for any deficiencies that would render sharpening attempts futile.
The hexagonal shaft of the pencil must be straight, as bowing can lead to “shudder” in hand-crank sharpeners and irregular collars produced by pocket sharpeners. Rolling a pencil under your palm on a flat surface should reveal any bowing.
Make sure the graphite core is centered within the wooden shaft. An off-center lead will produce a point that gets progressively more difficult to sharpen evenly. Employing a pocketknife (see Chapter 4) will afford greater flexibility in pointing an errant core, but even still, the pencil user will have to moderate his or her pressure while applying that side of the point which runs closest to the edge of the shaft. Best to simply discard those pencils with cores that are more than 25% off-axis.
The raw top of a new pencil should be free of paint. The iconic yellow (or black, or blue) shaft of a pencil is colored by dipping it into a vat of paint; any paint that adheres to the raw end of a pencil bespeaks of irregularities in the finishing process, which, in turn, suggests irregularities in earlier stages of production — irregularities that indicate unfortunate compromise in matters more significant than aesthetics!
Remember: A pencil point enjoyed by the writer may not be suited for the draftsman; the ideal point for the standardized-test taker laboring in an over-lit classroom may not please the louche poet idling on a windswept peak. No point can serve all needs. The unsharpened pencil is, in contrast, an idealized form. Putting a point on a pencil — making it functional — is to lead it out of Plato’s cave and into the noonday sun of utility. Of course, life outside a cave runs the risk of imperfection and frustration. But we must learn to live with these risks if we want enough oxygen to survive.