Ok, so upholstering your own furniture isn't exactly what we would call a simple do-it-yourself project, but it doesn't have to be a headache, either. Case in point: this gorgeous tufted headboard, made by Jamie Antonioli for Schue Love. While the project takes about a day or two to finish, we think that the end result is definitely worth it. Just keep reading for the how-to.
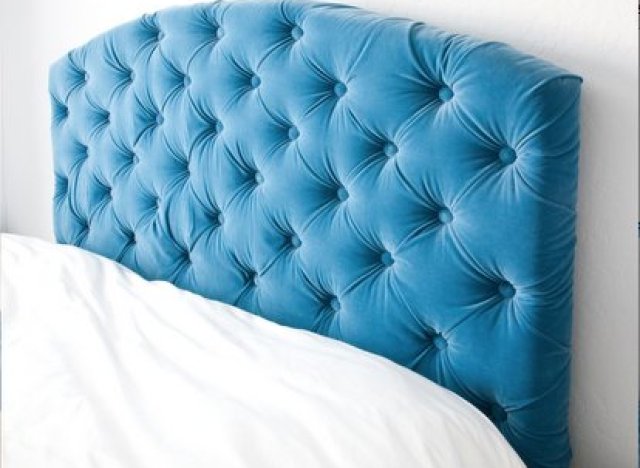
Photo by Jamie Antonioli for Schue Love
First, gather your supplies. For this project, you will need:
A piece of plywood
3-inch thick foam
Polyester batting
A button cover kit
Upholstery needle and thread
Zip ties
Fabric (at least 3 yards)
A drill
A circular saw
A staple gun
To start, cut your plywood into the shape you want your headboard to be. You can choose to keep it rectangular or give it a slightly curved top, as shown here. Then, lay your buttons in a diamond pattern across your plywood, making sure to space them evenly apart. The size of your headboard will decide just how many buttons you need. When you have your pattern figured out, drill holes where you want each button to go.
Next, use a spray adhesive to attach your foam to your headboard and trim it to fit. Wrap your polyester batting around the foam side of the board and secure it in place by stapling it to the plywood. When that's done, use your button kit to cover your buttons with fabric. Then, cut your upholstery thread into 8-inch long pieces and tie them to each button. When you're ready to start making your tufts, begin by covering your headboard with fabric. Starting from the back part of your headboard, stick an upholstery needle through a hole so that it pokes through the foam and thread your button in place. Tie the thread to a zip tie on the back side of the fabric to keep it secure. Then, bring your needle back through the fabric and tape it to the zip tie before pulling everything through the hole in your plywood. Pull the button as tight as you can and tie it in place. Repeat this process with your other buttons, adjusting your fabric as you move along to make sure it drapes the way you want it to. When you are finished, pull back any extra fabric and stable it in place.
For the full tutorial, visit Schue Love.
CORRECTION: An earlier version of this story identified Jamie Antonioli as a blogger. She is a photographer.